Kontaktní formulář
VIDEA


DOMETIC refrigerator

fix the gas alarm

POTENTIAL SOLUTIONS

Fill the gas tank, open the stopcocks or reset the crash sensor:
  1. Check the level of your gas tank on the control panel by pressing „INFO“ and subsequently selecting the gas tank. Now the level of gas is indicated. If the tank is empty, please refill. If the tank is still sufficiently filled, please proceed to the next step.
  2. Remove the cover from the gas tank.
  3. Push the green button on the crash sensor with a key or a similar object and keep pushing for several seconds in order to open the closed valve.
  4. Press the exclamation mark button (i.e. the reset button) to make the refrigerator commence to look for gas. Wait for a little while and repeat this step several times if need be.
The refrigerator should now be able to find gas again and the error should have disappeared.

ALDE heating

fix a gas outing

POTENTIAL SOLUTIONS

Refill the gas tank, open stopcocks or reset the crash sensor:
  1. Check the level of the gas tank on the control panel by pressing the „INFO“ button and select the gas tank. The level will be indicated. If the tank is empty, please refill. If the tank is still sufficiently filled, please proceed to the next step.
  2. Remove the cover from the gas tank.
  3. Push the green button of the crash sensor with a key or a similar object and keep pushing for several seconds in order to open the locked valve.
  4. Remove the grey cover of the fuse box in the electrical compartment.
  5. Remove the 10A fuses for the heating (see description on the cover) and wait for several seconds before reinserting the fuse to reset the electronics for the heating.
The heating should now receive gas again and the error should have disappeared

VB-Airsuspension ActiveAir Chassis

error correction

POTENTIAL SOLUTIONS

Change the fuse.
  1. Turn off the ignition.
  2. Unlock the hood with the lever in the driver’s footwell and open the hood.
  3. Control the 15A fuse of the ActiveAir system.
  4. Take the 15A and 7,5A fuse out of its mounts.
  5. Remove the 15A fuse.
  6. Remove the 7,5A fuse.
  7. Put a new 15A fuse back in. When doing this, please pay attention that the 7,5A fuse has to be removed beforehand since this could otherwise lead to an electrical short and the 15A would blow.
  8. Now you can reinsert the 7,5A fuse and put back both fuses into their mounts. Close the hood.
Refill the gas tank, open stopcocks or reset the crash sensor:

THULE

Fix awning error

POTENTIAL SOLUTIONS

Reset the awning or reprogramme:
  1. Aktivieren Sie den Inverter/Wechselrichter.
  2. Legen Sie die grüne 220V Sicherung (Grün) im betreffenden Sicherungskasten im E-Fach um (ausschalten).
  3. Drücken Sie die obere Taste der Fernbedienung, halten Sie diese gedrückt und legen Sie währenddessen die Sicherung wieder um, um die Programmierung der Markise auf Grundeinstellung zurückzusetzen.
Attention: In self-sufficient operation, the inverter has to be constantly active while the the awning is out since it will otherwise lose its zero point again.

Now you can use your awning as usual again.

Manually open the roller

plissee behind the windscreen

POTENTIAL SOLUTIONS

You can operate the roller plissee manually until the motor has been repaired:
  1. Take the Allen key out of your handover bag. You should find it in the inner top compartment of the bag.
  2. Open the left upper front cupboard and take out the inner shelf. Next, remove the backwall which is fixed with Velcro fastener. Should your motorhome have a drop-down bed instead of front cupboards, please move it downwards and partially remove the fabric.
  3. Remove the plastic ring from the gearbox.
  4. Put the Allen key into the intended opening.
  5. Push the button on the gearbox backwards and continue to push it. In the meantime manually move the plissee upwards with the Allen key.

Flap in the entry doorstep

manually and secure it while driving

POTENTIAL SOLUTIONS 1

Flap in the footstep manually:
  1. On the right side behind the footstep you can find a pin with which you need to attach the footstep later on.
  2. Move both the footstep and the cover upwards manually.
  3. Attach the footstep with the pin.

Flap in the entry doorstep

manually and secure it while driving

POTENTIAL SOLUTIONS 2

Separate the entry footstep from the motor and flap it in manually:
  1. Fasten the nut on the screw with a wrench so that the screw can move out. Thus, you can separate the footstep from the motor and you can operate it manually.
  2. On the right side behind the footstep you can find a pin with which you need to attach the footstep later on.
  3. Move both the footstep and the cover upwards manually.
  4. Attach the footstep with the pin.

Where can you find the fuses?


INSTRUCTIONS

  1. In a flap left to the entry door you can find the fuses in labelled boxes for the power supply, refrigerator, heater, air conditioning, awning, sockets, vacuum cleaner, coffee machine, drop-down bed etc. Depending on the type of vehicle this can be the first or the second flap next to the door.
  2. Open the flap beneath the glove compartment. There you can find further fuses which are described on the inside of the flap.

Control panel malfunction

activate SOS mode

POTENTIAL SOLUTION 1

Activate SOS mode for MORELO HOME or MORELO LOFT:
  1. Open the exterior flap behind which you can find the electronical compartments.
  2. Remove the cover of the corresponding fuse box.
  3. Insert a 20A fuse into the empty SOS holder in the fuse box in order to activate the SOS mode.
All of the important functions such as light, water pump etc. are now active again. The operating panel, however, remains deactivated.

Control panel malfunction

activate SOS mode

POTENTIAL SOLUTION 2

Activate SOS mode for MORELO PALACE or MORELO EMPIRE:
  1. Open the exterior flap behind which you can find the electronical compartments.
  2. Remove the cover of the fuse box by using a screwdriver.
  3. Toggle the flip switch labelled „SOS“ into the other direction. You can now see a red light which shows that the SOS function has now been activated.
All of the important functions such as light, water pump etc. are now active again. The operating panel, however, remains deactivated.

Restart the E&P

hydraulics lift support system

POTENTIAL SOLUTION

System reboot:
  1. Open the flap right of the entry door.
  2. On the roof of the flap you can find a nine-contact connector. Pull it out and wait for several seconds. Put it back in, in order to restart the system. You should be able to hear an acoustic signal.
You can switch the E&P operating panel back on as usual.

MORELO

Morelo Open 2022

MORELO

Pálení čarodějnic 2022 - pátek

MORELO

Pálení čarodějnic 2022 - sobota

MORELO

Morelo Vip Days Praha 2020

MORELO OPEN 2019

30.5. - 2.6. 2019

MORELO

VIP DAYS 2019 - pátek 8. března

MORELO

VIP DAYS 2019 - sobota 9. března

MORELO

VIP DAYS 2019 - neděle 10. března

MORELO

MORELO OPEN 2015

MORELO

For Caravan 2018

MORELO

GRAND EMPIRE LINER

MORELO

Grand Empire

Prima - Autosalon

Empire Liner 110 GSB 2019

MORELO

Nový model MORELO PALACE 2019

MORELO

Za polárním kruhem -35 stupňů

MORELO

Ukázka vozů

MORELO

Technická část – MORELO Šasi
 

MORELO

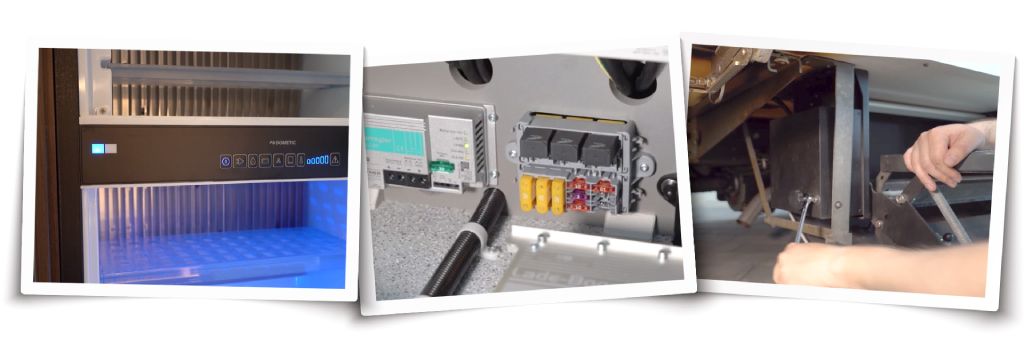
Technická část – MORELO Podlaha a rozvod elektřiny a vody

MORELO

Technická část – MORELO Nábytek

MORELO

Technická část – MORELO Interiér

MORELO

Technická část – MORELO Exteriér

MORELO

Technická část – MORELO Cocpit

MORELO

Technická část – VB ActiveAir

MORELO

Technická část – VB ActiveAir Test

MORELO

Technická část – E&P Hydraulické nohy I.

MORELO

Technická část – E&P Hydraulické nohy II.

MORELO

Technická část – Webasto I.

MORELO

Technická část – Webasto II.

MORELO

Technická část – Webasto III.

MORELO

Technická část - Topný systém ALDE

MORELO

Technická část – Topný systém Alde s výměníkem

MORELO

Technická část – Dometic